Difference between revisions of "Desperate"
| (4 intermediate revisions by the same user not shown) | |||
| Line 32: | Line 32: | ||
===Enemies=== | ===Enemies=== | ||
| − | + | <center> | |
| − | + | {| class="wikitable" | |
| − | + | |+ | |
| − | + | |- | |
| − | + | ! [[Green Baki]] !! [[Boom Baki]] !! [[Balloon]] !! [[Seedling]] !! [[Heavy Twins]] !! [[Spring (Toy)|Spring]] !! [[Hopper]] !! [[Megamini]] !! [[Bounce]] | |
| − | + | |- | |
| − | + | | [[File:Green_Baki_toy.png|50px|center|link=Green Baki]] || [[File:Boom_Baki_toy.png|50px|center|link=Boom Baki]] || [[File:Balloon.png|50px|center|link=Balloon]] || [[File:Seedling_toy.png|50px|center|link=Seedling]] || [[File:Heavy_Twins_toy.png|75px|center|link=Heavy Twins]] || [[File:Spring_toy.png|50px|center|link=Spring (Toy)]] || [[File:Hopper_toy.png|50px|center|link=Hopper]] || [[File:Megamini_toy.png|50px|center|link=Megamini]] || [[File:Bounce_toy.png|75px|center|link=Bounce]] | |
| − | + | |} | |
| − | + | </center> | |
===Build Mode=== | ===Build Mode=== | ||
| Line 71: | Line 71: | ||
|-|Imagination Battle= | |-|Imagination Battle= | ||
<gallery widths="310" captionsize="medium" captiontextcolor="#8e8e8e" bordersize="none" bordercolor="transparent" captionalign="center" spacing="small" position="center"> | <gallery widths="310" captionsize="medium" captiontextcolor="#8e8e8e" bordersize="none" bordercolor="transparent" captionalign="center" spacing="small" position="center"> | ||
| + | -11TurmoiloftheMind.png|Turmoil of the Mind Title Card | ||
| + | TOTM1.jpg|The first section of Turmoil of the Mind. | ||
| + | TOTM2.png|The second section of Turmoil of the Mind. | ||
| + | TOTM3.jpg|The third section of Turmoil of the Mind. | ||
| + | TOTM4.jpg|The fourth and final section of Turmoil of the Mind. | ||
TRSHADOWBG.png|The Shadow Biome used in Turmoil of the Mind. | TRSHADOWBG.png|The Shadow Biome used in Turmoil of the Mind. | ||
</gallery> | </gallery> | ||
Latest revision as of 22:07, 26 January 2025
This Article Contains Spoilers! This article may contain major plot spoilers that threaten to ruin elements of the story! |
| Desperate | |
| Characteristics | |
|---|---|
| Species | Shadow |
| Gender | Unknown |
| Age | Unknown |
| Fur Color | No Fur
|
| Information | |
| Home | Belleview |
| Story Role | Antagonist Boss |
| Occupation | N/A |
| Status | Unknown (Assumed Alive) |
| Game(s) | 
|


Desperate are Shadow beings in Drawn to Life: Two Realms. They are some of Aldark's minions, and the Hero encounters one after confronting Aldark at the School. A few more of them appear when Aldark reveals the Shadow to Belleview.
 Appearance[edit]

Desperate is a Shadow hand that appears out of a red portal. It only has four "fingers" and a toothy grin on its palm. Its portal has some shadow surrounding it as well.
 Imagination Battle[edit]

–Level Description
Desperate's Imagination Battle in Drawn to Life: Two Realms is named Turmoil of the Mind. It is the eleventh story level in the game, and has four segments. When Mike and the Hero return from Rapoville, Aldark confronts them outside the School. The Hero refuses to fight Aldark, so he summons a Desperate to test the Hero. After defeating the Desperate, Mike runs off to go check on Aly.
Enemies[edit]
| Green Baki | Boom Baki | Balloon | Seedling | Heavy Twins | Spring | Hopper | Megamini | Bounce |
|---|---|---|---|---|---|---|---|---|
 |
 |
 |
 |
 |
 |
 |
 |
 |
Build Mode[edit]
In Build Mode, the player is given a Hopper, a Megamini, and a Bounce. One possible solution is for the player to place the Hopper on the blocks in the center of the left section, the Megamini under the red door, and the Bounce under the floating platform.
–Completion Text
| Imagination Battles | |
|---|---|
| Last Level Cambium Exploration |
Next Level Landlubber's Lament |
Trivia[edit]
- Like all of Aldark's Shadow creatures, Desperate's name is never stated in game, but has been found in the game's files.
- Desperate's mind level is one of three to have four segments.
- Completing Turmoil of the Mind will unlock the Imagination Battles for Farmer Brown, Galileo, the Megamini, Professor Chuck, Dr. Cure, Kate, Matt Swipe, Tiffany, Tubba, and the Carrier Robot.
 Media[edit]

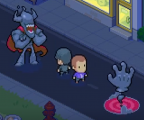
A Desperate and a Furious terrorizing Bobby Tweeth and Matt Swipe.


Turmoil of the Mind Title Card

The first section of Turmoil of the Mind.
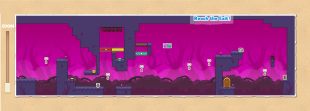
The second section of Turmoil of the Mind.

The third section of Turmoil of the Mind.

The fourth and final section of Turmoil of the Mind.

The Shadow Biome used in Turmoil of the Mind.


Concept art of Desperate, called "Desperation" in this image.

