Difference between revisions of "Heather"
(Undo revision 22432 by Trolley the Vandal is back once again (talk)) Tag: Undo |
|||
| Line 1: | Line 1: | ||
| − | [[File: | + | {{Featured|Previous}} |
| + | {{spoiler|the entire [[Drawn to Life Series]]|boxcolor=#319418}} | ||
| + | {{Infobox/Character | ||
| + | |boxcolor = #319418 | ||
| + | |name = Heather | ||
| + | |image = {{SubTab/Heather | ||
| + | |SIdle=[[File:Heather.gif|center]] | ||
| − | + | |SLeft=[[File:Heather-side2.gif|center]] | |
| + | |SRight=[[File:Heather-side.gif|center]] | ||
| − | + | |SBehind=[[File:Heather-back.gif|center]] | |
| + | |||
| + | |SWFront=[[File:Heather-walk.gif|center]] | ||
| + | |SWBack=[[File:HeatherBackWalk.gif|center]] | ||
| + | |SWLeft=[[File:HeatherWalkLeft.gif|center]] | ||
| + | |SWRight=[[File:HeatherWalkRight.gif|center]] | ||
| + | |||
| + | |SJump=[[File:Heather-jump.gif|center]] | ||
| + | |SFear=[[File:Heather-fear.gif|center]] | ||
| + | |SSad=[[File:HeatherSad.gif|center]] | ||
| + | |||
| + | |NSIdle=[[File:HeatherNoShadow.gif|center]] | ||
| + | |||
| + | |NSLeft=[[File:ShadowlessHeatherSide2.gif|centre]] | ||
| + | |NSRight=[[File:ShadowlessHeatherSide.gif|centre]] | ||
| + | |||
| + | |NSBehind=[[File:ShadowlessHeatherBack.gif|centre]] | ||
| + | |||
| + | |NSWFront=[[File:ShadowlessHeatherWalk.gif|centre]] | ||
| + | |NSWLeft=[[File:ShadowlessHeatherSideWalk2.gif|centre]] | ||
| + | |NSWRight=[[File:ShadowlessHeatherSideWalk.gif|centre]] | ||
| + | |NSWBack=[[File:ShadowlessHeatherBackWalk.gif|centre]] | ||
| + | |||
| + | |PointUp=[[File:Heather point up.gif|center]] | ||
| + | |LoseColor=[[File:HeatherNoColour.gif|center]] | ||
| + | |RevealPendant=[[File:HeatherPendantOut.gif|centre]] | ||
| + | |Pendant=[[File:HeatherPendant.gif|center]] | ||
| + | |ScepterOut=[[File:HeatherSceptreOut.gif|centre]] | ||
| + | |ScepterIdle=[[File:Heather-sceptre.gif|center]] | ||
| + | |ScepterWield1=[[File:HeatherSceptre1.gif|centre]] | ||
| + | |ScepterWield2=[[File:HeatherSceptre2.gif|centre]] | ||
| + | |ScepterTransform=[[File:HeatherSceptreTransform.gif|center]] | ||
| + | |PortalReveal=[[File:HeatherPortalReveal.gif|centre]] | ||
| + | |PortalPull=[[File:HeatherPortalPull.gif|center]] | ||
| + | |PortalClose=[[File:HeatherPortalClose.gif|centre]] | ||
| + | |ScepterShadow=[[File:Shadow-heather-sceptre.gif|center]] | ||
| + | |||
| + | |Transform=[[File:Heather-shadow-transformation.gif|center]] | ||
| + | |Shadow=[[File:Shadow-heather.gif|center]] | ||
| + | |||
| + | |TRIdle=[[File:Heather_idle_down.gif|center]] | ||
| + | |TRIdleBack=[[File:Heather_idle_up.gif|center]] | ||
| + | |||
| + | |TRWalk=[[File:Heather_walk_down.gif|center]] | ||
| + | |TRWalkBack=[[File:Heather_walk_up.gif|center]] | ||
| + | |||
| + | |TRJump=[[File:Heather_celebrate.gif|center]] | ||
| + | |TRSurprised=[[File:Heather_surprised.gif|center]] | ||
| + | |TRHappy=[[File:Heather_happy.gif|center]] | ||
| + | |TRSad=[[File:Heather_sad.gif|center]] | ||
| + | |TRAngry=[[File:Heather_angry.gif|center]] | ||
| + | |TRThinking=[[File:Heather_thinking.gif|center]] | ||
| + | |||
| + | |TRUIdle=[[File:Heathern_idle_down.gif|center]] | ||
| + | |TRUIdleBack=[[File:Heathern_idle_up.gif|center]] | ||
| + | |||
| + | |TRUWalk=[[File:Heathern_walk_down.gif|center]] | ||
| + | |TRUWalkBack=[[File:Heathern_walk_up.gif|center]] | ||
| + | |||
| + | |TRUJump=[[File:Heathern_celebrate.gif|center]] | ||
| + | |TRUSurprised=[[File:Heathern_surprised.gif|center]] | ||
| + | |TRUHappy=[[File:Heathern_happy.gif|center]] | ||
| + | |TRUSad=[[File:Heathern_sad.gif|center]] | ||
| + | |TRUAngry=[[File:Heathern_angry.gif|center]] | ||
| + | |TRUThinking=[[File:Heathern_thinking.gif|center]] | ||
| + | }} | ||
| + | |species = [[Raposa]] <small>([[Rapoville]])</small><br>[[Human]] <small>([[Belleview]])</small> | ||
| + | |gender = Female | ||
| + | |age = Child <small>(Rapoville)</small><br>Teen <small>(Belleview)</small> | ||
| + | |fur = Orange Fur/Shadow<br>Blonde Hair/Shadow | ||
| + | |home = [[Rapoville]] | ||
| + | |role = Protagonist | ||
| + | |status = Alive | ||
| + | |games = {{Icon|DTL}}<br>{{Icon|Wii}}<br>{{Icon|TNC}}<br>{{Icon|TR}} | ||
| + | }} | ||
| + | {{Quote | ||
| + | |text=God... Just bring back my little brother to me. | ||
| + | }} | ||
| + | |||
| + | '''Heather''' is one of the protagonists of the [[Drawn to Life Series]], first appearing in [[Drawn to Life]] and later starring as a main character in [[Drawn to Life: The Next Chapter]]. Heather is a young, timid [[Raposa]] who hardly speaks, and remains silent for most of the original ''[[Drawn to Life]]''. Her most notable feature is the [[Shadow]] covering the left half of her face. Heather was held captive by [[Frostwind]] in the [[Snow Gate]] in the original Drawn to Life and she was later possessed by [[Wilfre]] in ''Drawn to Life: The Next Chapter''. Heather was taught to speak by [[Crazy Barks]] and she quickly learns from him being able to speak in full sentences by the time she is possessed. | ||
| + | |||
| + | However, in reality, '''Heather''' is not a Raposa, but a [[Human]] who was sent to the Raposa realm after a severe car accident. In the Human realm, Heather is older and more outgoing than her Raposa self, and she takes responsibility for her younger brother, [[Mike]]. As Mike was recovering, Heather stayed by his side, showing her compassion and love for him. Four years after the crash, Heather was influenced by [[Aldark]]'s [[Shadow]] in ''[[Drawn to Life: Two Realms]]'', but she is saved by the [[Hero]]. Heather would go on to help the Hero save Mike after the latter was influenced by Aldark's shadow. | ||
| + | |||
| + | =={{Icon|Tower}} Appearance == | ||
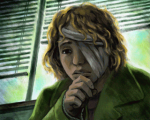
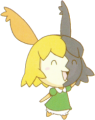
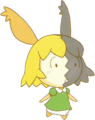
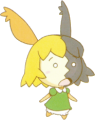
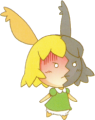
| + | In her Raposa form, Heather is depicted with orange fur and has blonde hair. While she was infected by [[Shadow]], the left side of her head appears completely darkened. Heather wears a green, collared dress with a white, puffy underskirt peeking out.. At the beginning of ''[[Drawn to Life: The Next Chapter]]'', Heather wears a [[Heather's Pendant|ruby pendant]] around her neck, and during ''[[Drawn to Life: The Next Chapter (Wii)]]'', she carries a croquet mallet. After being rescued from Wilfre, the shadow on Heather's head disappears. | ||
| + | |||
| + | In her Human form, Heather appears much older. She has blonde hair styled in bangs with a small cowlick on top of her head. She wears a green jacket with a white undershirt and pink pants and brown shoes, reminiscent of her Raposa form. | ||
| + | |||
| + | == {{Icon|Book}} Story == | ||
| + | ===Before Drawn to Life=== | ||
| + | Heather grew up in [[Belleview]] with her parents and younger brother, [[Mike]]. Eventually, a travelling carnival was invited to visit the town, so the family went to visit. While at the carnival, the kids had won two plush animals resembling [[Mari]] and [[Jowee]]. On their way home, a heavy storm began, and that, along with an unpaved road and some reckless driving, caused a major car accident between the family and [[Deputy Snyder]], killing Heather's parents, putting Mike in a coma, and severely injuring Heather. | ||
| + | |||
| + | ===''Drawn to Life''=== | ||
| + | In ''[[Drawn to Life]]'', Heather is first seen while the [[Hero]] is fighting [[Frostwind]], as she had been captured some time before. She will occasionally drop [[Heart]]s and [[Snowshooter|Snowballs]] for the Hero to use, and after Frostwind is defeated, she comes to [[Rapoville]] with the Hero. Back in the village, Heather does not speak, and [[Jowee]] is scared of her due to the [[Shadow]] on her face. She hides from the other villagers, but when she is found by the Hero, the [[Mayor]] appoints Jowee as her guardian. | ||
| + | |||
| + | Throughout the game, Heather is seen with Jowee, although he tries to leave her on multiple occasions, such as when he runs into the [[Forest Gate]] and when he has a moment with [[Mari]] on the [[Secret Beach]]. By the end of the game, Heather becomes friends with [[Crazy Barks]], and she begins to learn how to speak from him. | ||
| + | |||
| + | ===''Drawn to Life: The Next Chapter (Wii)''=== | ||
| + | {{NoncanonSection|boxcolor=#319418}} | ||
| + | In the non-canon ''[[Drawn to Life: The Next Chapter (Wii)]]'', Heather is able to speak in full sentences, and Heather and [[Crazy Barks]] are much closer, as she is the only one who can translate his barks. She is first seen when the [[Book of Life]] goes missing, and she explains that Crazy Barks took it because he sensed danger in [[Rapoville|the village]]. Throughout the game, she stands with Barks by the windmill until he goes missing. [[Circi]] and [[Jowee]] tell her to stay with Mari while Jowee and the Hero explore [[Shadow City (Level)|Shadow City]] to find him. When the two are reunited, Heather explains that Crazy Barks found a path to the [[Shadow Labyrinth]]. | ||
| + | |||
| + | ===''Drawn to Life: The Next Chapter''=== | ||
| + | ====As a Raposa==== | ||
| + | ''[[Drawn to Life: The Next Chapter]]'' begins with Heather having a nightmare about [[Wilfre]] returning and draining the color from a picnic she had with [[Mari]] and [[Jowee]]. When she wakes up, she decides to go on a walk through [[Rapoville]] to the [[Secret Beach]], where she finds a treasure chest with a [[Wilfre's Scepter|strange scepter]] inside. This causes [[Wilfre]] to possess her body, kickstarting his plans. | ||
| + | |||
| + | The next morning, Jowee and Mari ask the villagers if they had seen Heather than day, when the [[Color]] suddenly starts to drain from the village. Wilfre appears, kidnapping some of the villagers, but as he escapes in a portal, Heather briefly pulls away from him, leaving Jowee with a cryptic message - "Kemi-Kewa!" As Wilfre pulls her away, she leaves [[Heather's Pendant|her pendant]] with Jowee, and he takes it with the remaining villagers to [[Turtle Rock]]. | ||
| + | |||
| + | Throughout the story, Heather's Pendant guides Jowee and the remaining villagers to [[Watersong]], [[Lavasteam]], and [[Galactic Jungle]], but Wilfre, disguised as [[Sock]], eventually throws it off the vessel, seemingly leaving the group stranded. When the group arrives at [[Wilfre's Wasteland]] and the [[Hero]] defeats Wilfre once and for all, Heather is left behind, now shadowless, and she returns to Jowee. When the group returns to a restored Rapoville, Heather is present as the [[Creator]] ignites the [[Eternal Flame]], waking [[Mike]] up. | ||
| + | |||
| + | ====As a Human==== | ||
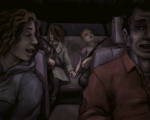
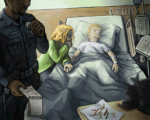
| + | Meanwhile, while the events of this game had been happening, Heather's human form had been resting with [[Mike]] in the hospital with bandages covering the left side of her face. She had been desperately praying to [[Creator|God]] to bring Mike back. Before Mike wakes up, a police officer comes into their room to ask Heather some questions about the crash and asking her to draw what she remembered from that day. As she draws her picture for the officer, Mike wakes up from his coma. She rushes over to his side and hugs him as the officer alerts a nurse that Mike had woken up. | ||
| + | {{NoncanonSection|boxcolor=#319418}} | ||
| + | In later editions, the credits scenes depict vastly different events leading to Mike's presence in the Raposa's world. The replacement storyline is significantly less dramatic, depicts very little injury, and does not result in the death of Heather and Mike's parents. | ||
| + | |||
| + | As the credit scene depicts, Heather, her parents, and her brother [[Mike]] go camping together one night. During the trip, Heather and Mike are trying to catch fireflies. When Mike climbs up a tree to reach a firefly, he steps on a weak branch and falls to the ground. The impact knocks him unconscious. As their parents run over to check on [[Mike]], Heather begins to pray to the [[Creator|God]], asking for Mike to wake up. He does so almost immediately, and the siblings embrace. | ||
| + | |||
| + | ===In between The Next Chapter and Two Realms=== | ||
| + | [[Mike]] is discharged from the hospital by the time Heather's bandages are removed, and the two of them go to live with their [[Uncle Owen]] in [[Belleview]]. At the memorial service for Heather's parents, a fight erupts after the villagers blame each other for the accident, proving to Heather that the villagers didn't care about her or her brother, only their own guilt. Heather also notices [[Aly]] beginning to spend more and more time with Mike. | ||
| + | |||
| + | ===''Drawn to Life: Two Realms''=== | ||
| + | Four years later and shortly before the events of ''[[Drawn to Life: Two Realms]]'', Heather is influenced by [[Aldark]]'s [[Shadow]], bringing out the negative emotions within her. When she is first seen in the game, [[Mike]] meets her outside [[Mr. Esow]]'s shop with the [[Hero]]. She complains about how Mike is always late and unreliable, but the Hero uses the [[Book of Imagination]] to clear the shadow from her mind, calming her down. | ||
| + | |||
| + | Some time later, Heather is worried about Mike, who was sleeping all morning after visiting [[Rapoville]]. She wakes him up with the Hero, and she tells him that [[Aly]] called. After Mike runs out to meet Aly, Heather talks with the Hero, believing them to be a new resident of [[Belleview]]. She explains that the villagers had been acting weird since the accident, asking the Hero to not judge them too much. | ||
| + | |||
| + | After Mike and Aly are both influenced by Aldark's shadow, she asks the Hero to go find Mike and bring him home. After Mike comes home, Heather asks him what happened, and he gets angry, brushing her off and leaving her alone with the Hero. Upset, she explains how the carnival impacted her family and the town. She asks the Hero to go talk to Aly in hopes that they could resolve whatever had happened. | ||
| + | |||
| + | Later on, Heather, Aly, and [[Tony]] discuss how Mike had seemingly disappeared through a portal, although Heather and Aly don't believe him. After the Hero finds Mike in Rapoville and they both return to Belleview, Heather watches on as Mike finally confronts [[Deputy Snyder]] about the accident, blaming the officer for his parent's deaths. The Hero clears the Shadow from both of their minds, and Heather takes Mike home. | ||
| + | |||
| + | =={{Icon|BoI}} Imagination Battle== | ||
| + | {{Quote | ||
| + | |text=Looks like Heather's about to blow a gasket! Better give Mike a hand! | ||
| + | |character=Level Description | ||
| + | }} | ||
| + | Heather's Imagination Battle in [[Drawn to Life: Two Realms]] is named '''Sibling Revelry'''. It is the third story level in the game, and has three segments. After exploring [[Belleview]], the [[Hero]] watches as [[Mike]] meets Heather outside [[Mr. Esow's Shop]]. She berates him for being late, not being dependable, and missing one of her birthdays. The Hero steps in before Heather can get any madder and enters her mind. Afterwards, she apologizes for what she said and asks Mike about the groceries they need to buy. | ||
| + | |||
| + | ====Enemies==== | ||
| + | * [[Megamini]] | ||
| + | * [[Acorn Baki]] | ||
| + | * [[Bounce]] | ||
| + | |||
| + | ====Build Mode==== | ||
| + | In Build Mode, the player is given a [[Bounce]] and three [[Megamini]]s. One possible solution is for the player to put a Megamini on each of the first two floating platforms, place the Bounce on the third, and the final Megamini on the fourth. | ||
| + | {{Quote | ||
| + | |text=Nice! Now to make sure Mike doesn't miss any more birthdays. | ||
| + | |character=Completion Text | ||
| + | }} | ||
| + | {{IBNav | ||
| + | |prev=[[Tony#Imagination Battle|Scooter Thieves Beware]] | ||
| + | |next=[[Mr. Esow#Imagination Battle|Blaming Bigwig]] | ||
| + | |boxcolor=#319418 | ||
| + | }} | ||
| + | |||
| + | == {{Icon|Quote}} Quotes == | ||
| + | <tabber> | ||
| + | |-|Drawn to Life = | ||
| + | {{ScrollBox | ||
| + | |width=auto | ||
| + | |content= | ||
| + | {{Quote|text=...|caption=Heather's dialog for most of the first game.}} | ||
| + | {{Quote|text=HERORESCUEDMEFROMSCARYDRAGON!|caption=Heather's first "word" after being taught how to speak by [[Crazy Barks]].}} | ||
| + | {{Quote|text=Wapo...|caption=Heather after the completion of the first game.}} | ||
| + | }} | ||
| + | |-|Drawn to Life: The Next Chapter (DS)= | ||
| + | {{ScrollBox | ||
| + | |width=auto | ||
| + | |content= | ||
| + | {{Quote|text=It was dark and raining<br>We were near a forest<br>I was wearing the coat<br>A dark monster<br>Thick black smoke<br>We were alone...<br>I was holding on to him<br>I tried to look away<br>It all happened so fast|caption=All of Heather's possible responses to the police officer.}} | ||
| + | {{Quote|text=Creator... Just bxrnu acck ii gggitl bfahrr uo em|caption=Heather's prayer at the beginning of the game}} | ||
| + | {{Quote|text=Kemi-Kewa, you must stop Wilfre! Kemi-Kewa!!|caption=Upon being pulled into Wilfre's vortex.}} | ||
| + | {{Quote|text=God... Just bring back my little brother to me|caption=Heather's prayer at the end of the game}} | ||
| + | }} | ||
| + | |-|Drawn to Life: Two Realms= | ||
| + | {{ScrollBox | ||
| + | |width=auto | ||
| + | |content= | ||
| + | {{Quote|text=You're always late. I can't depend on you for anything!}} | ||
| + | {{Quote|text=It just goes to show how little you care... I had a balloon set up for you and everything...}} | ||
| + | {{Quote|text=Sorry for yelling at you. Not sure why I was so upset.}} | ||
| + | {{Quote|text=Aly just called. She wanted to meet you at the Park.}} | ||
| + | {{Quote|text=Mike! I don't know what's gotten into you… but you should apologize!}} | ||
| + | {{Quote|text=Raposa? Why does that name sound so familiar?}} | ||
| + | {{Quote|text=It all started after… after the Carnival... a few years ago.}} | ||
| + | {{Quote|text=After the car accident, Mike woke up and everyone was thankful… But our parents were still gone. The whole town came out for the memorial service. Mike was obviously upset… One thing led to another, and before you knew it, the whole town started blaming each other. Why did they ever invite the carnival to visit? Should they have repaved the road the accident occurred on? No one really thought of my brother, just themselves. How to make their own guilt go away. It's gone downhill since then. Mike blames himself for causing it, but it's not his fault. Aly was the only one that took the time to care. So, it's not a surprise that he's taking this hard.|captions=Heather explaining the accident to the [[Hero]]}} | ||
| + | {{Quote|text=Tony claims that Mike disappeared... through some kind of... portal.}} | ||
| + | {{Quote|text=You seem familiar... Do you live nearby?|caption=Heather's early game dialogue}} | ||
| + | {{Quote|text=I'm glad you are here, Hero!|caption=Heather's mid-game dialogue}} | ||
| + | {{Quote|text=Hope you'll be staying around a while to keep us company, Hero!|caption=Heather's late game dialogue}} | ||
| + | }} | ||
| + | |-|Drawn to Life: The Next Chapter (Wii) = | ||
| + | {{ScrollBox | ||
| + | |width=auto | ||
| + | |content= | ||
| + | {{Quote|text=Crazybarks says he smelled danger. He had to protect the Book.|caption=After the [[Book of Life]] goes missing at the beginning of the game.}} | ||
| + | {{Quote|text=Hero, do you like cupcakes?}} | ||
| + | {{Quote|text=Jowee! Crazybarks has gone through the Shadow Gate!|caption=After the level Shadow City Outer Walls is completed.}} | ||
| + | {{Quote|text=What's that, boy? You found a path to the Shadow Labyrinth?|caption=Heather translating Crazybarks after he is retrieved from the Shadow Gate.}} | ||
| + | {{Quote|text=LA-LA-LA-LA-LA!}} | ||
| + | {{Quote|text=Hero, I saw Mari crying the other day.}} | ||
| + | {{Quote|text=Such a curious turn of events. Life is so full of mystery.<br>You are kind as you are brave. Thank you!|caption=Heather after the final boss is defeated.}} | ||
| + | }} | ||
| + | </tabber> | ||
| + | |||
| + | == {{IconSVG|Trivia}} Trivia == | ||
| + | * Based on [[Mike]]'s full name, Heather's full name is likely '''Heather Row'''.<ref name="identifier">[[File:MikeName.png|100px]]</ref> | ||
| + | * Heather was the one who drew the pictures at the beginning of ''[[Drawn to Life: The Next Chapter]]''. | ||
| + | ** This means that the player has played as the [[Creator]], the [[Hero]], and Heather. | ||
| + | * In the original ''[[Drawn to Life]]'', when Heather looks to the right of the screen, it shows her right side so it should not show the black side of her head, yet it still does. | ||
| + | ** This was fixed in Drawn to Life: The Next Chapter. | ||
| + | * In the [[Human]] realm, Heather is [[Mike]]'s older sister, while in the [[Raposa]] realm, she appears to be younger than him. | ||
| + | * The half of Heather's face that is covered in Shadow may represent the bandages that she is seen with in the canon ending when Mike wakes from his coma. | ||
| + | ** Since this side of her face is healed after the [[Wilfre|final boss]], this may imply Heather's face in the Human realm was healed at the same time. | ||
| + | * Throughout the second game, Wilfre will sometimes show Heather who states, "Kemi-Kewa", which is an anagram for "Wake Mike". | ||
| + | * During the events of the first game, Heather is one of the only main characters to move around the village. | ||
| + | * Heather's picture on the cover of ''The Art of 5th Cell'' is mirrored such that the Shadow is on the right side of her face instead of the left. | ||
| + | ** This is because the final cover art was flipped later in development, as seen by earlier drafts. | ||
| + | * Heather shares her name with a character in an earlier game developed by 5th Cell called "Mini Poccha". | ||
| + | * She is one of the few Raposa to not have their idle sprite replaced in Drawn to Life: The Next Chapter. | ||
| + | ** She shares this trait with [[Cookie]], [[NavyJ]], and [[Farmer Brown]]. | ||
| + | * It is possible that Heather could have been inspired by the Norse goddess [[:wikipedia:Hel|Hel]], as she also has a face that is half black, and is rescued in the snow world, representing Hel's powers of ice. | ||
| + | * She is one of four characters to sing in the series. The others being [[Mari]], [[Jowee]] and [[Rose]]. | ||
| + | * According to a line of dialogue in ''[[Drawn to Life: The Next Chapter (Wii)]]'', Heather is unaware that half of her face is covered in Shadow. | ||
| + | ** It is unknown if this is true for the canon games. | ||
| + | * In the Wii game, Heather carries a croquet racquet as a reference to the musical [[:wikipedia:Heathers (musical)|Heathers]]. | ||
| + | ** Heather was originally going to be much more inspired by this musical for the Wii game, but she was changed to better resemble her appearance in Drawn to Life. | ||
| + | * Heather's Raposa form was originally planned to appear in ''[[Drawn to Life: Two Realms]],'' but she was cut so that the Raposa and Human forms of Heather could be the same being. | ||
| + | ** Raposa Heather is given the name "Heathern" in the files | ||
| + | * According to the Raposa-Human counterpart document used during development, Heather was meant to be 12 years old.<ref>[[File:ConnectionSheet1.jpg|50px]]</ref>. | ||
| + | ** However, given that the sheet was made very early into development, this likely isn't canon. | ||
| + | * [[Wilfre]], the [[Creator]], and Heather are the only three beings initially aware of the fact that the [[Raposa]] world is a dream by [[Mike]]. | ||
| + | ** When speaking to Wilfre, the Creator says, “You will not have him. He will fight you. He will win, he is not yours to control.” Wilfre then replies, “…You don’t care about us! Only him...” Also, whilst being pulled into one of Wilfre’s portals, Heather says, “Kemi-Kewa, you must stop Wilfre! Kemi-Kewa!!”; Kemi-Kewa is “Wake Mike” spelt backwards. | ||
| + | *** Interestingly, Mike himself was never aware of the Raposa world being a dream. | ||
| + | |||
| + | == {{Icon|Painting}} Media == | ||
| + | <center> | ||
| + | <tabber> | ||
| + | |-|Screenshots= | ||
| + | <gallery widths="310" captionsize="medium" captiontextcolor="#8e8e8e" bordersize="none" bordercolor="transparent" captionalign="center" spacing="small" position="center"> | ||
| + | Heather.png|Heather finding treasure. | ||
| + | HeatherWithEvilStick.png|Heather holding [[Wilfre's Scepter]]. | ||
| + | DTL2Ending_3.png | ||
| + | DTL2Ending_6.png | ||
| + | DTL2Ending_9.png | ||
| + | DTL2Ending_10.png | ||
| + | DTL2Ending_12.png | ||
| + | DTL2_Ending2_2.png | ||
| + | DTL2_Ending2_3.png | ||
| + | DTL2_Ending2_4.png | ||
| + | DTL2_Ending2_7.png | ||
| + | DTL2_Ending2_10.png | ||
| + | DTL2_Ending2_12.png | ||
| + | </gallery> | ||
| + | |||
| + | |-|Wii Game= | ||
| + | <gallery widths="310" captionsize="medium" captiontextcolor="#8e8e8e" bordersize="none" bordercolor="transparent" captionalign="center" spacing="small" position="center"> | ||
| + | HeatherWii.png|Heather in ''[[Drawn to Life: The Next Chapter (Wii)]]''. | ||
| + | HeatherWii2.png | ||
| + | HeatherTalkSprite.png|Heather's talksprite in Drawn to Life: The Next Chapter (Wii) | ||
| + | </gallery> | ||
| + | |||
| + | |-|Imagination Battle= | ||
| + | <gallery widths="310" captionsize="medium" captiontextcolor="#8e8e8e" bordersize="none" bordercolor="transparent" captionalign="center" spacing="small" position="center"> | ||
| + | SR1.png|Sibling Revelry, Part 1 | ||
| + | SR2.png|Sibling Revelry, Part 2 | ||
| + | SR3.png|Sibling Revelry, Part 3 | ||
| + | </gallery> | ||
| + | |||
| + | |-|Concept Art= | ||
| + | <gallery widths="310" captionsize="medium" captiontextcolor="#8e8e8e" bordersize="none" bordercolor="transparent" captionalign="center" spacing="small" position="center"> | ||
| + | HeatherConcept1.png|Heather as she appears in "The Art of 5thCell." | ||
| + | HeatherConcept2.png|Heather as she appears in "The Art of 5thCell." | ||
| + | HeatherConcept3.png|Heather as she appears in "The Art of 5thCell." | ||
| + | HeatherEmoteConcept_Smile.png|Official Emotion Concept Art. | ||
| + | HeatherEmoteConcept_Smile2.png|Official Emotion Concept Art. | ||
| + | HeatherEmoteConcept_Wink.png|Official Emotion Concept Art. | ||
| + | HeatherEmoteConcept_Shock.png|Official Emotion Concept Art. | ||
| + | HeatherEmoteConcept_Shock2.png|Official Emotion Concept Art. | ||
| + | HeatherEmoteConcept_Angry.png|Official Emotion Concept Art. | ||
| + | Fullheather.png | ||
| + | </gallery> | ||
| + | |||
| + | |-|Beta and Unused= | ||
| + | <gallery widths="310" captionsize="medium" captiontextcolor="#8e8e8e" bordersize="none" bordercolor="transparent" captionalign="center" spacing="small" position="center"> | ||
| + | HeathersWii1.jpg|An early model of Heather for [[Drawn to Life: The Next Chapter (Wii)]]. | ||
| + | HeathersWii2.jpg|An early model of Heather for Drawn to Life: The Next Chapter (Wii). | ||
| + | Ending_12_03.jpg|An early version of a still seen in [[Real Life (Song)|Real Life]]. | ||
| + | HeathernIB.png|Practical Prankster, an Imagination Battle for Heather's unused [[Raposa]] form. | ||
| + | </gallery> | ||
| + | |||
| + | |-|Misc= | ||
| + | <gallery widths="310" captionsize="medium" captiontextcolor="#8e8e8e" bordersize="none" bordercolor="transparent" captionalign="center" spacing="small" position="center"> | ||
| + | Heathers Pendant Alpha.png|Heather's Pendant. | ||
| + | Redpendant2.png|Heather holding her [[Pendant]]. | ||
| + | JoweeHouseFront.png|Heather in front of Jowee's House. | ||
| + | 25uij2h.jpg.png|Heather with Mari and Jowee. | ||
| + | HeatherScream.gif|Heather screaming in the dream sequence of [[Drawn to Life: The Next Chapter]]. | ||
| + | </gallery> | ||
| + | |||
| + | </tabber> | ||
| + | </center> | ||
| + | |||
| + | =={{Icon|Note}} References== | ||
| + | <references/> | ||
| + | {{Navbox/Character|Drawn to Life|Heather|boxcolor=#319418}} | ||
| + | [[Category:Characters]] | ||
| + | [[Category:Shadow]] | ||
| + | [[Category:Raposa]] | ||
| + | [[Category:Humans]] | ||
| + | [[Category:Drawn to Life]] | ||
| + | [[Category:Drawn to Life: The Next Chapter]] | ||
| + | [[Category:Drawn to Life: The Next Chapter (Wii)]] | ||
| + | [[Category:Recurring Characters]] | ||
| + | [[Category:Rapoville]] | ||
| + | [[Category:Belleview]] | ||
| + | [[Category:Characters in Drawn to Life]] | ||
| + | [[Category:Characters in Drawn to Life: The Next Chapter]] | ||
| + | [[Category:Characters in Drawn to Life: The Next Chapter (Wii)]] | ||
| + | [[Category:Drawn to Life: Two Realms]] | ||
| + | [[Category:Characters in Drawn to Life: Two Realms]] | ||
| + | [[Category:Story Levels in Drawn to Life: Two Realms]] | ||
Revision as of 19:18, 4 March 2024
This Article Contains Spoilers! This article may contain major plot spoilers that threaten to ruin elements of the story! |
| Heather | |
| Characteristics | |
|---|---|
| Species | Raposa (Rapoville) Human (Belleview) |
| Gender | Female |
| Age | Child (Rapoville) Teen (Belleview) |
| Fur Color | Orange Fur/Shadow Blonde Hair/Shadow |
| Information | |
| Home | Rapoville |
| Role | Protagonist |
| Last Known Status | Alive |
| Game(s) | |


–Heather
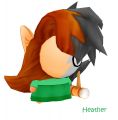
Heather is one of the protagonists of the Drawn to Life Series, first appearing in Drawn to Life and later starring as a main character in Drawn to Life: The Next Chapter. Heather is a young, timid Raposa who hardly speaks, and remains silent for most of the original Drawn to Life. Her most notable feature is the Shadow covering the left half of her face. Heather was held captive by Frostwind in the Snow Gate in the original Drawn to Life and she was later possessed by Wilfre in Drawn to Life: The Next Chapter. Heather was taught to speak by Crazy Barks and she quickly learns from him being able to speak in full sentences by the time she is possessed.
However, in reality, Heather is not a Raposa, but a Human who was sent to the Raposa realm after a severe car accident. In the Human realm, Heather is older and more outgoing than her Raposa self, and she takes responsibility for her younger brother, Mike. As Mike was recovering, Heather stayed by his side, showing her compassion and love for him. Four years after the crash, Heather was influenced by Aldark's Shadow in Drawn to Life: Two Realms, but she is saved by the Hero. Heather would go on to help the Hero save Mike after the latter was influenced by Aldark's shadow.
 Appearance
In her Raposa form, Heather is depicted with orange fur and has blonde hair. While she was infected by Shadow, the left side of her head appears completely darkened. Heather wears a green, collared dress with a white, puffy underskirt peeking out.. At the beginning of Drawn to Life: The Next Chapter, Heather wears a ruby pendant around her neck, and during Drawn to Life: The Next Chapter (Wii), she carries a croquet mallet. After being rescued from Wilfre, the shadow on Heather's head disappears.
In her Human form, Heather appears much older. She has blonde hair styled in bangs with a small cowlick on top of her head. She wears a green jacket with a white undershirt and pink pants and brown shoes, reminiscent of her Raposa form.
 Story
Story
Before Drawn to Life
Heather grew up in Belleview with her parents and younger brother, Mike. Eventually, a travelling carnival was invited to visit the town, so the family went to visit. While at the carnival, the kids had won two plush animals resembling Mari and Jowee. On their way home, a heavy storm began, and that, along with an unpaved road and some reckless driving, caused a major car accident between the family and Deputy Snyder, killing Heather's parents, putting Mike in a coma, and severely injuring Heather.
Drawn to Life
In Drawn to Life, Heather is first seen while the Hero is fighting Frostwind, as she had been captured some time before. She will occasionally drop Hearts and Snowballs for the Hero to use, and after Frostwind is defeated, she comes to Rapoville with the Hero. Back in the village, Heather does not speak, and Jowee is scared of her due to the Shadow on her face. She hides from the other villagers, but when she is found by the Hero, the Mayor appoints Jowee as her guardian.
Throughout the game, Heather is seen with Jowee, although he tries to leave her on multiple occasions, such as when he runs into the Forest Gate and when he has a moment with Mari on the Secret Beach. By the end of the game, Heather becomes friends with Crazy Barks, and she begins to learn how to speak from him.
Drawn to Life: The Next Chapter (Wii)
This Section of Heather Contains Non-Canon Content! |
In the non-canon Drawn to Life: The Next Chapter (Wii), Heather is able to speak in full sentences, and Heather and Crazy Barks are much closer, as she is the only one who can translate his barks. She is first seen when the Book of Life goes missing, and she explains that Crazy Barks took it because he sensed danger in the village. Throughout the game, she stands with Barks by the windmill until he goes missing. Circi and Jowee tell her to stay with Mari while Jowee and the Hero explore Shadow City to find him. When the two are reunited, Heather explains that Crazy Barks found a path to the Shadow Labyrinth.
Drawn to Life: The Next Chapter
As a Raposa
Drawn to Life: The Next Chapter begins with Heather having a nightmare about Wilfre returning and draining the color from a picnic she had with Mari and Jowee. When she wakes up, she decides to go on a walk through Rapoville to the Secret Beach, where she finds a treasure chest with a strange scepter inside. This causes Wilfre to possess her body, kickstarting his plans.
The next morning, Jowee and Mari ask the villagers if they had seen Heather than day, when the Color suddenly starts to drain from the village. Wilfre appears, kidnapping some of the villagers, but as he escapes in a portal, Heather briefly pulls away from him, leaving Jowee with a cryptic message - "Kemi-Kewa!" As Wilfre pulls her away, she leaves her pendant with Jowee, and he takes it with the remaining villagers to Turtle Rock.
Throughout the story, Heather's Pendant guides Jowee and the remaining villagers to Watersong, Lavasteam, and Galactic Jungle, but Wilfre, disguised as Sock, eventually throws it off the vessel, seemingly leaving the group stranded. When the group arrives at Wilfre's Wasteland and the Hero defeats Wilfre once and for all, Heather is left behind, now shadowless, and she returns to Jowee. When the group returns to a restored Rapoville, Heather is present as the Creator ignites the Eternal Flame, waking Mike up.
As a Human
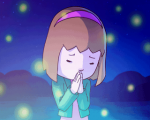
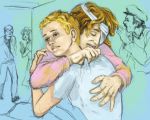
Meanwhile, while the events of this game had been happening, Heather's human form had been resting with Mike in the hospital with bandages covering the left side of her face. She had been desperately praying to God to bring Mike back. Before Mike wakes up, a police officer comes into their room to ask Heather some questions about the crash and asking her to draw what she remembered from that day. As she draws her picture for the officer, Mike wakes up from his coma. She rushes over to his side and hugs him as the officer alerts a nurse that Mike had woken up.
This Section of Heather Contains Non-Canon Content! |
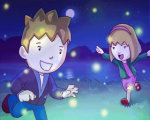
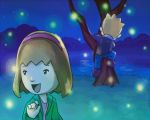
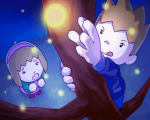
In later editions, the credits scenes depict vastly different events leading to Mike's presence in the Raposa's world. The replacement storyline is significantly less dramatic, depicts very little injury, and does not result in the death of Heather and Mike's parents.
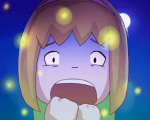
As the credit scene depicts, Heather, her parents, and her brother Mike go camping together one night. During the trip, Heather and Mike are trying to catch fireflies. When Mike climbs up a tree to reach a firefly, he steps on a weak branch and falls to the ground. The impact knocks him unconscious. As their parents run over to check on Mike, Heather begins to pray to the God, asking for Mike to wake up. He does so almost immediately, and the siblings embrace.
In between The Next Chapter and Two Realms
Mike is discharged from the hospital by the time Heather's bandages are removed, and the two of them go to live with their Uncle Owen in Belleview. At the memorial service for Heather's parents, a fight erupts after the villagers blame each other for the accident, proving to Heather that the villagers didn't care about her or her brother, only their own guilt. Heather also notices Aly beginning to spend more and more time with Mike.
Drawn to Life: Two Realms
Four years later and shortly before the events of Drawn to Life: Two Realms, Heather is influenced by Aldark's Shadow, bringing out the negative emotions within her. When she is first seen in the game, Mike meets her outside Mr. Esow's shop with the Hero. She complains about how Mike is always late and unreliable, but the Hero uses the Book of Imagination to clear the shadow from her mind, calming her down.
Some time later, Heather is worried about Mike, who was sleeping all morning after visiting Rapoville. She wakes him up with the Hero, and she tells him that Aly called. After Mike runs out to meet Aly, Heather talks with the Hero, believing them to be a new resident of Belleview. She explains that the villagers had been acting weird since the accident, asking the Hero to not judge them too much.
After Mike and Aly are both influenced by Aldark's shadow, she asks the Hero to go find Mike and bring him home. After Mike comes home, Heather asks him what happened, and he gets angry, brushing her off and leaving her alone with the Hero. Upset, she explains how the carnival impacted her family and the town. She asks the Hero to go talk to Aly in hopes that they could resolve whatever had happened.
Later on, Heather, Aly, and Tony discuss how Mike had seemingly disappeared through a portal, although Heather and Aly don't believe him. After the Hero finds Mike in Rapoville and they both return to Belleview, Heather watches on as Mike finally confronts Deputy Snyder about the accident, blaming the officer for his parent's deaths. The Hero clears the Shadow from both of their minds, and Heather takes Mike home.
 Imagination Battle
–Level Description
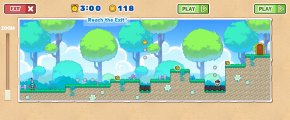
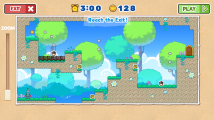
Heather's Imagination Battle in Drawn to Life: Two Realms is named Sibling Revelry. It is the third story level in the game, and has three segments. After exploring Belleview, the Hero watches as Mike meets Heather outside Mr. Esow's Shop. She berates him for being late, not being dependable, and missing one of her birthdays. The Hero steps in before Heather can get any madder and enters her mind. Afterwards, she apologizes for what she said and asks Mike about the groceries they need to buy.
Enemies
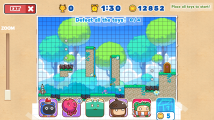
Build Mode
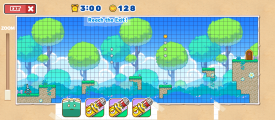
In Build Mode, the player is given a Bounce and three Megaminis. One possible solution is for the player to put a Megamini on each of the first two floating platforms, place the Bounce on the third, and the final Megamini on the fourth.
–Completion Text
| Imagination Battles | |
|---|---|
| Last Level Scooter Thieves Beware |
Next Level Blaming Bigwig |
 Quotes
Trivia
- Based on Mike's full name, Heather's full name is likely Heather Row.[1]
- Heather was the one who drew the pictures at the beginning of Drawn to Life: The Next Chapter.
- In the original Drawn to Life, when Heather looks to the right of the screen, it shows her right side so it should not show the black side of her head, yet it still does.
- This was fixed in Drawn to Life: The Next Chapter.
- In the Human realm, Heather is Mike's older sister, while in the Raposa realm, she appears to be younger than him.
- The half of Heather's face that is covered in Shadow may represent the bandages that she is seen with in the canon ending when Mike wakes from his coma.
- Since this side of her face is healed after the final boss, this may imply Heather's face in the Human realm was healed at the same time.
- Throughout the second game, Wilfre will sometimes show Heather who states, "Kemi-Kewa", which is an anagram for "Wake Mike".
- During the events of the first game, Heather is one of the only main characters to move around the village.
- Heather's picture on the cover of The Art of 5th Cell is mirrored such that the Shadow is on the right side of her face instead of the left.
- This is because the final cover art was flipped later in development, as seen by earlier drafts.
- Heather shares her name with a character in an earlier game developed by 5th Cell called "Mini Poccha".
- She is one of the few Raposa to not have their idle sprite replaced in Drawn to Life: The Next Chapter.
- She shares this trait with Cookie, NavyJ, and Farmer Brown.
- It is possible that Heather could have been inspired by the Norse goddess Hel, as she also has a face that is half black, and is rescued in the snow world, representing Hel's powers of ice.
- She is one of four characters to sing in the series. The others being Mari, Jowee and Rose.
- According to a line of dialogue in Drawn to Life: The Next Chapter (Wii), Heather is unaware that half of her face is covered in Shadow.
- It is unknown if this is true for the canon games.
- In the Wii game, Heather carries a croquet racquet as a reference to the musical Heathers.
- Heather was originally going to be much more inspired by this musical for the Wii game, but she was changed to better resemble her appearance in Drawn to Life.
- Heather's Raposa form was originally planned to appear in Drawn to Life: Two Realms, but she was cut so that the Raposa and Human forms of Heather could be the same being.
- Raposa Heather is given the name "Heathern" in the files
- According to the Raposa-Human counterpart document used during development, Heather was meant to be 12 years old.[2].
- However, given that the sheet was made very early into development, this likely isn't canon.
- Wilfre, the Creator, and Heather are the only three beings initially aware of the fact that the Raposa world is a dream by Mike.
- When speaking to Wilfre, the Creator says, “You will not have him. He will fight you. He will win, he is not yours to control.” Wilfre then replies, “…You don’t care about us! Only him...” Also, whilst being pulled into one of Wilfre’s portals, Heather says, “Kemi-Kewa, you must stop Wilfre! Kemi-Kewa!!”; Kemi-Kewa is “Wake Mike” spelt backwards.
- Interestingly, Mike himself was never aware of the Raposa world being a dream.
- When speaking to Wilfre, the Creator says, “You will not have him. He will fight you. He will win, he is not yours to control.” Wilfre then replies, “…You don’t care about us! Only him...” Also, whilst being pulled into one of Wilfre’s portals, Heather says, “Kemi-Kewa, you must stop Wilfre! Kemi-Kewa!!”; Kemi-Kewa is “Wake Mike” spelt backwards.
 Media
Media
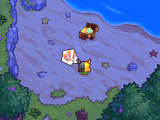
Heather finding treasure.

Heather holding Wilfre's Scepter.


Heather in Drawn to Life: The Next Chapter (Wii).

Heather's talksprite in Drawn to Life: The Next Chapter (Wii)


Sibling Revelry, Part 1
Sibling Revelry, Part 2
Sibling Revelry, Part 3


Heather as she appears in "The Art of 5thCell."

Heather as she appears in "The Art of 5thCell."
Heather as she appears in "The Art of 5thCell."

Official Emotion Concept Art.
Official Emotion Concept Art.

Official Emotion Concept Art.
Official Emotion Concept Art.
Official Emotion Concept Art.
Official Emotion Concept Art.


An early model of Heather for Drawn to Life: The Next Chapter (Wii).
An early model of Heather for Drawn to Life: The Next Chapter (Wii).
An early version of a still seen in Real Life.
Practical Prankster, an Imagination Battle for Heather's unused Raposa form.


Heather's Pendant.
Heather holding her Pendant.
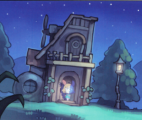
Heather in front of Jowee's House.

Heather with Mari and Jowee.
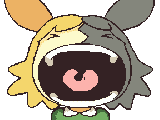
Heather screaming in the dream sequence of Drawn to Life: The Next Chapter.


