Difference between revisions of "Molemite"
| (4 intermediate revisions by 2 users not shown) | |||
| Line 2: | Line 2: | ||
{{Infobox/Enemy | {{Infobox/Enemy | ||
|name = Molemite | |name = Molemite | ||
| − | |image = | + | |image =<tabber> |
| − | <tabber> | + | |-|Drawn to Life: The Next Chapter= |
| − | + | {{#tag:tabber| | |
| − | + | {{!}}-{{!}}Emerge= [[File:DynamiteMole_Emerge.gif|center]] | |
| − | + | {{!}}-{{!}}Idle= [[File:DynamiteMole_Idle.gif|center]] | |
| − | + | {{!}}-{{!}}Look= [[File:DynamiteMole_Look.gif|center]] | |
| − | + | {{!}}-{{!}}Throw= [[File:DynamiteMole_Throw.gif|center]] | |
| − | + | {{!}}-{{!}}Dig= [[File:DynamiteMole_Tunnel.gif|center]] | |
| − | + | {{!}}-{{!}}Hurt= [[File:DynamiteMole_Hurt.png|center]] | |
| − | + | {{!}}-{{!}}Hat= [[File:MoleHat.gif|center]] | |
| + | {{!}}-{{!}}Dynamite= [[File:Dynamite.gif]] [[File:MoleExplosion.gif]] | ||
| + | }} | ||
| + | |-|Drawn to Life: Two Realms= | ||
| + | {{#tag:tabber| | ||
| + | {{!}}-{{!}}Idle=[[File:MolemiteTR (Idle).gif|center]] | ||
| + | {{!}}-{{!}}Walk=[[File:MolemiteTR (Walk).gif|center]] | ||
| + | {{!}}-{{!}}Angry=[[File:MolemiteTR (Angry).gif|center]] | ||
| + | }} | ||
</tabber> | </tabber> | ||
|species = Mole | |species = Mole | ||
| Line 50: | Line 58: | ||
</table> | </table> | ||
</div> | </div> | ||
| + | |||
| + | == {{Icon|BoI}} Imagination Battle == | ||
| + | {{Quote | ||
| + | |text=Send these pests back to the Crystal Caverns! | ||
| + | |character=Level Description | ||
| + | }} | ||
| + | '''Die-no-might''' is an optional battle in [[Drawn to Life: Two Realms]], has one segment, and takes place inside a Molemite's mind. | ||
| + | |||
| + | ====Rewards==== | ||
| + | :'''One Star'''<small> (500 points)</small>: 30 [[Rapo-Coins]] | ||
| + | :'''Two Stars'''<small> (1500 points)</small>: 70 [[Rapo-Coins]] | ||
| + | :'''Three Stars'''<small> (2500 points)</small>: Clown Shoes [[Sticker]] | ||
| + | |||
| + | ====Required Enemies==== | ||
| + | * None | ||
| + | |||
| + | ====Build Mode==== | ||
| + | For this level, the player is required to place 5 toys and reach the exit. | ||
=={{Icon|Quote}} Quotes== | =={{Icon|Quote}} Quotes== | ||
| Line 61: | Line 87: | ||
}} | }} | ||
| − | == {{ | + | == {{IconSVG|Trivia}} Trivia == |
* Molemites will always throw dynamite at the [[Hero]], even when separated by walls or other obstacles. | * Molemites will always throw dynamite at the [[Hero]], even when separated by walls or other obstacles. | ||
* Dynamite thrown by Molemites can be destroyed by the Hero's weapon. | * Dynamite thrown by Molemites can be destroyed by the Hero's weapon. | ||
| Line 68: | Line 94: | ||
<center> | <center> | ||
<tabber> | <tabber> | ||
| − | |-| | + | |-|Screenshots= |
<gallery orientation="none" position="center" widths="310" spacing="small" bordercolor="transparent" bordersize="small" captiontextcolor="#8e8e8e" captionalign="center" captionposition="below"> | <gallery orientation="none" position="center" widths="310" spacing="small" bordercolor="transparent" bordersize="small" captiontextcolor="#8e8e8e" captionalign="center" captionposition="below"> | ||
MolePreview.png|A Molemite throwing dynamite in a level. | MolePreview.png|A Molemite throwing dynamite in a level. | ||
| + | MolemiteRapovilleTR.png|A Molemite next to the [[Wishing Well]] in Two Realms. | ||
| + | </gallery> | ||
| + | |-|Imagination Battle= | ||
| + | <gallery orientation="none" position="center" widths="310" spacing="small" bordercolor="transparent" bordersize="small" captiontextcolor="#8e8e8e" captionalign="center" captionposition="below"> | ||
| + | DieNoMight.png|Die-no-might Title Card | ||
| + | Die-no-might.png|Die-no-might | ||
| + | TRFACTORYBG.png|The Factory Biome used in Die-no-might | ||
</gallery> | </gallery> | ||
|-|Sound= | |-|Sound= | ||
Latest revision as of 19:10, 27 January 2025
| Molemite | |
| Information | |
|---|---|
| Species | Mole |
| Variant | None |
| Health | |
| Attack Type | Projectile (Dynamite) |
| Item Drops | |
| Games | |
–Molemite
Molemites are stationary, mole-like enemies found in some Drawn to Life: The Next Chapter levels. They first appear in Crystal Caverns, and are later seen in some portions of Rocky Railroad. One Molemite also appears in Rapoville in Drawn to Life: Two Realms.
When within visible range of the Hero, Molemites will begin to throw dynamite at them. These enemies throw three pieces of dynamite at, or near, The Hero before looking around and tunneling underground for a short while. While underground, Molemites are invulnerable.
Molemites wear hardhats, which means they cannot be killed by being jumped on and must be attacked using a weapon. Due to this, the best time to attack is when the Molemite is going through their "looking" animation, as they won't throw dynamite during this phase.
 Appearance[edit]
Molemites are semi-anthropomorphic enemies. They have purple fur all over their bodies except their hands, feet, and muzzle, and they wear a yellow hard-hat and carry a backpack full of dynamite sticks. Like many enemies in the Drawn to Life series, they have large white eyes.
 Levels[edit]


 Imagination Battle[edit]
–Level Description
Die-no-might is an optional battle in Drawn to Life: Two Realms, has one segment, and takes place inside a Molemite's mind.
Rewards[edit]
- One Star (500 points): 30 Rapo-Coins
- Two Stars (1500 points): 70 Rapo-Coins
- Three Stars (2500 points): Clown Shoes Sticker
Required Enemies[edit]
- None
Build Mode[edit]
For this level, the player is required to place 5 toys and reach the exit.
 Quotes[edit]
Trivia[edit]
- Molemites will always throw dynamite at the Hero, even when separated by walls or other obstacles.
- Dynamite thrown by Molemites can be destroyed by the Hero's weapon.
 Media[edit]
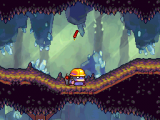
A Molemite throwing dynamite in a level.
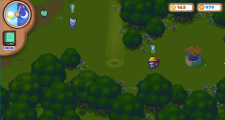
A Molemite next to the Wishing Well in Two Realms.


Die-no-might Title Card

Die-no-might

The Factory Biome used in Die-no-might


Explosion
Enemy Death